Monday, February 25, 2013

Winter Seed Starting

At last, I can once again get my hands in the dirt and get this new gardening season started! I know what you're thinking, it's winter! But I have to get an early start if I want beautiful, robust plants come planting time in May. 
I've recieved the Geranium seed I ordered in January, and because they need a long growing time before they are ready to be planted in the garden, I have to sow these seeds now!
It's only been 4 days since I sowed the seeds and already they have started germinating!
With the exact growing conditions that they require, you will have great success.

At the end of each growing season I winter over a supply of geraniums which I keep growing on a sunny windowsill. Geraniums make great winter houseplants, all they need is bright light, fertilizer every now and then, and very little water. I use mine to take cuttings from. It's a quick and easy way to duplicate the number of geranium plants you have, and it saves you a lot of money too.


To take a cutting, select a 2-4 inch length of stem and cut it off above a leaf. Peel off the bottom leaves on the stem and any flower buds, leaving 2 leaves at the top.


To improve success rates, dip the base of each cutting in a small amount of rooting hormone to stimulate root growth. Press the cutting into the bed of soil and press the soil firmly around the plant so that the stem is supported and until it begins to grow a new root system. Space the cuttings out about three inches to give them room to grow.


Put the new cuttings in a warm location but not in direct light. Do not cover the plants, as this can encourage mildew to develop on the leaves. Water the cuttings sparingly for the first week and then increase watering to keep soil moist.

In about 4-5 weeks, you should feel some resistance when you gently tug on the cuttings. This tells you the cuttings have rooted and can soon be transplanted in a bigger pot and be exposed to more direct sunlight. At that time we will be moving all the young plants out to our greenhouse.


Jess Gallas
Shelburne Museum Head Gardener

Monday, February 18, 2013

George Washington Like You've Never Seen Him Before!

Though Conservation Fellow Josiah Wagener's project primarily involves the conservation treatment of painted folk art, he took some time out to help me out with the  photo documentation of one of my projects using a new-to-us technology. We're grateful to the Samuel H. Kress Foundation for funding Josiah's work here at Shelburne Museum. 

Here's Josiah:

How do you fully document a large counter relief object such as this early 19th century cake mold featuring General Washington?

The cake mold as photographed under normal conditions in the lab.


It has deep shadows, sharp corners, gentle curves, highlights, stains, cracks, grain color, and polishing from past use. How can you get all of that detail in to a simple photograph? Well, instead of a photograph how about an RTI?


RTI, short for Reflectance Transform Imaging, is a technique in which multiple photographs are taken of an object with the light coming from a different direction in each picture. The several photographs are then fed into a special computer program that combines them, reads the surface texture of the object, and creates a composite image with almost 3-dimensional feel.


31 images were assembled to create this RTI
Once the image has been created one can use the viewer program to virtually pan a light across the surface of the digital object, just as one might tilt and rotate an actual object under a light to get the best view of the highlights and details. Here's a screen capture of what its like to look at the RTI using the viewer program:


The RTI documents all the details of the object for posterity.

Although the technology has been available for a few years it is just beginning to see popular use and has never been used here at Shelburne before. Thanks to the work of the folks at Cultural Heritage Imaging, the RTI tools and technique have become much more easily available to anyone who wants to use this powerful technology. I recently taught myself the technique and assembled the necessary (very basic) equipment, and with the help of conservation intern Rosella Fevola,  we successfully created an RTI image of the Washington cake mold on our first attempt.

We intend to keep experimenting with the opportunities and limitations of this technology and find new ways to fit it into our conservation process here at Shelburne.

Monday, February 11, 2013

LEAP! this summer

Though there's still an undeniable chill in the air around the Museum, we in Education are hard at work planning our 2013 LEAP! (Learn + Play) summer camps. For seven very special weeks this July and August we invite campers ages five to thirteen to discover enchanted creatures, cook on an open hearth, join the circus, sail the high seas, and indulge their creative minds. 

One of our offerings is AHOY! A Week at Sea, a nautical-themed camp for six-to-eight year-olds that we ran for the first time last year. I wrote the curriculum for AHOY!, and experienced one of my all-time favorite museum moments on "Steamship Day," when we learned about the Ticonderoga and put ourselves in sailors' shoes.

Intern Callie and Lex practice their figure eight knots.
We're fortunate to have a knowledgeable Museum staff, including several true maritime experts. Peter Tomasi, our Ticonderoga carpenter, leads a group of dedicated volunteers who work on the boat year-round. One of them is Lex Nason, who has volunteered in the Ti workshop for eighteen years and over 8,000 hours. He and Peter generously offered to spend the morning teaching our campers the nautical knots they know and use.

A book of knots.
Each camper had their own three-foot length of rope. We began with basic overhand knots and worked our way up to figure-eights, which hold better and are also easier to untie when needed. Before long, our campers tied their water bottles together using their new skills and created a pulley system for hoisting them onto the tables!
Peter demonstrates a knot he uses on the Ticonderoga.
All hands on deck! Our water bottles get a boost.
We try to build activities into camps for staff to share their expertise with an eager young audience. On another afternoon during our "Week at Sea" campers questioned Shelburne Museum's Director of Buildings Chip Stulen, who happens to be trained in boat building, about ship design. Then campers built their own models complete with smokestacks, flags, figureheads, and rudders. My colleague Paige spoke with the kids about her years traveling the world on a cruise ship and told the Native American story of Natsilane and the killer whale, a fascinating piece of nautical folklore. 

I always look forward to planning these fun, creative, and interactive camp activities--they brighten the short winter days.
A sailor's life!
Camp registration is now open--click here to learn more about our offerings and download a registration form. We hope to see you this summer!

Monday, February 4, 2013

More Fun with Pleissner


A few months ago, I wrote about a new Pleissner exhibition I’ve been working on, which would feature his watercolor landscapes. 


Burnside, undated, watercolor on paper. ©Ogden M. Pleissner

Pebble Beach Golf Course, ca. 1950-1965, watercolor on paper.
©Ogden M. Pleissner

These are two of the paintings I decided to include in my exhibit.


A lot has happened since I first looked at these paintings, so today I’d like to catch up with you about it.  

Once I had finalized the selection, I needed to come up with a title for the show. After trying out a few different combinations, I settled on Ogden Pleissner, Landscape Painter. I liked it because it was simple yet descriptive, telling visitors what they can expect to see without giving everything away.

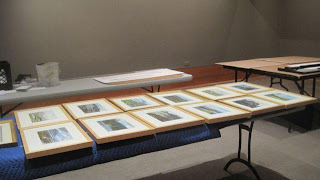
With the title taken care of, I then turned my attention to getting the pictures ready for hanging. Since a lot of the watercolors I had picked were unframed, I needed to have new frames built for them.  Suzy, one of our exhibits preparators, set up a frame shop in the middle of the gallery so that she could hang and frame in the same convenient location. 


Suzy's framing tables

While the pieces were being framed, I created the actual layout of the show. Pleissner rarely dated his works, so I organized the paintings thematically rather than chronologically. One wall focused on water scenes, for instance, while another highlighted forested landscapes. Once I was happy with the layout, I had Suzy hang the show for me.

The west wall of the gallery features rivers, lakes, and other water-oriented scenes.

The south wall focuses on trees.


While the show was being hung, I finished writing my labels, and had them proofread by our librarian and archivist, Polly. Once I was satisfied with the labels, Suzy had them printed and installed them next to their respective pieces.


The completed show

There you have it! With the help of Suzy, Polly, and the rest of the curatorial staff, I’ve been able to take my admiration for Pleissner’s watercolors and turn it into a new exhibition for the Museum.

Ogden Pleissner, Landscape Painter opens May 12, 2013 and runs through October, 27 in Pleissner Gallery. So be sure to check it out if you get a chance to visit this summer.