Showing posts with label Pleissner Gallery. Show all posts

Tuesday, March 20, 2012

Teaching Shelburne Museum


Last week I found myself  brandishing a tape measure and scale to study ceramic plates from a hundred year-old shipwreck laid out on the carpeted floor of Pleissner Gallery. This engaging, hands-on workshop was part of an ongoing partnership between Shelburne Museum and Turning Points in American History, a professional development program for Vermont educators that supports teaching in the social studies and seeks to build strong school-museum relationships.

Turning Points educators examine a ceramic plate from a canal boat "shipwreck" to review historical methods

At last week's Primary Source Study Group, Turning Points Co-Director Scott McLaughlin staged an early twentieth-century Lake Champlain canal boat wreck for a lesson in historical methods. He drew a cross section of the boat as it was found in the lake on a swath of fabric and unfurled it on the gallery floor. He then laid out artifacts that archaeologists have found in different parts of the boat, including a coin, a pipe, and a handcrafted doll. The ceramic plates that we used as primary sources were similar to artifacts that archaeologists have found in such wrecks. Primary Source Study Group participants collected data including the plates' condition, function, size, and weight, and then analyzed, synthesized, and interpreted these findings in order to date and contextualize the ceramics. By the end of the workshop, we were able to make conjectures about the family that lived on this particular canal boat based on our detailed study of the "material culture" they left behind.

Archaeologist's perspective drawing of the Sloop Island canal boat shipwreck (Adam Kane, 2004)

As a young museum professional interested in how to use art and artifacts to teach history, I have been tagging along with Turning Points study groups during their Shelburne Museum visits. I will write again soon to share the innovative ways that Primary Source Study Group participants are using what they learn at the Museum to teach with primary sources in the classroom. Hint: it involves less textbook readings and more staged shipwrecks.

Friday, January 27, 2012

Reconstructed Landscapes

Happy New Year from the Education Department!

Starting now and continuing every month through our May opening, we will be posting popular family art activities from Owl Cottage and the Art on the Go Carts for you to try at home. We hope to inspire you to break out your art supplies on these dark winter days and create something special! 

Pleissner, Clearing, Wyoming, 1932
Project: Constructed Landscapes

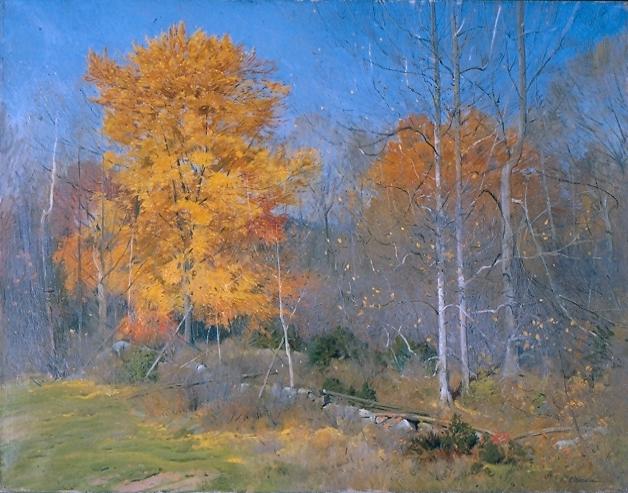
The landscape is a favorite artist's subject, and we have many of these scenes on view at the Museum. For this project, I  "reconstructed" two of Ogden Pleissner's early landscape paintings.

Pleissner painted Clearing, Wyoming (above) on a dude ranch in Dubois, Wyoming in 1932, where he and his wife spent seventeen summers. He completed Autumn, Lyme, Connecticut (below) in 1935. Both paintings are remarkable because Pleissner made them during the Great Depression, when he struggled to make a living as an artist.

Pleissner, Autumn, Lyme, Connecticut, 1935

Project Time: Approx. 20 minutes (excluding drying time)

Make a landscape collage out of materials you might find in a craft drawer or around the house. A landscape is a picture that shows a scene by land or sea. It can be real or make believe, but the subject is always nature--for example, fields, hills, forests, or water.

Materials:
-White poster board or card stock
-Tacky glue
-Glue sticks
-Scissors
-Tablecloths
-Wipes
-Pom poms (trees, bushes)
-Craft fluffs (clouds, snow, leaves)
-Yarn and ribbon (grass, mountains, sky)
-Buttons (rocks, shrubs, leaves)
-Pipe cleaners (trees)
-Feathers (trees)
-Glitter (sunlight)
-Newspaper & magazine clippings (hills, grass)
-Construction paper & tissue paper (sky, ground)

Directions:
1. Spread out tablecloths or newspaper. (This activity can be messy.)
2. Start with the poster board or card stock. You may want to sketch an idea in pencil first.
3. Choose materials for your project (see suggestions above and add some of your own!).
4. Arrange materials on the paper and then secure materials using glue sticks or tacky glue.
5. When the glue has dried, place the landscape collage on display for everyone to see.


You can see my pictures "under construction" below. Enjoy, and let us know how your Constructed Landscape goes! Be sure to check back in February for another fun art project, and don't miss Pleissner Gallery the next time you're at the Museum.